Overview
Todoist is a task-management platform used by teams and individuals to organize work into projects, sections, and tasks, with support for labels, priorities, due dates, deadlines, comments, and collaboration. The Todoist integration brings these primitives into the Workflow Builder so task-lifecycle activity fires customer-facing automations, and any workflow can manage Todoist tasks and projects without leaving the builder.
About the Integration
The integration ships with two halves:
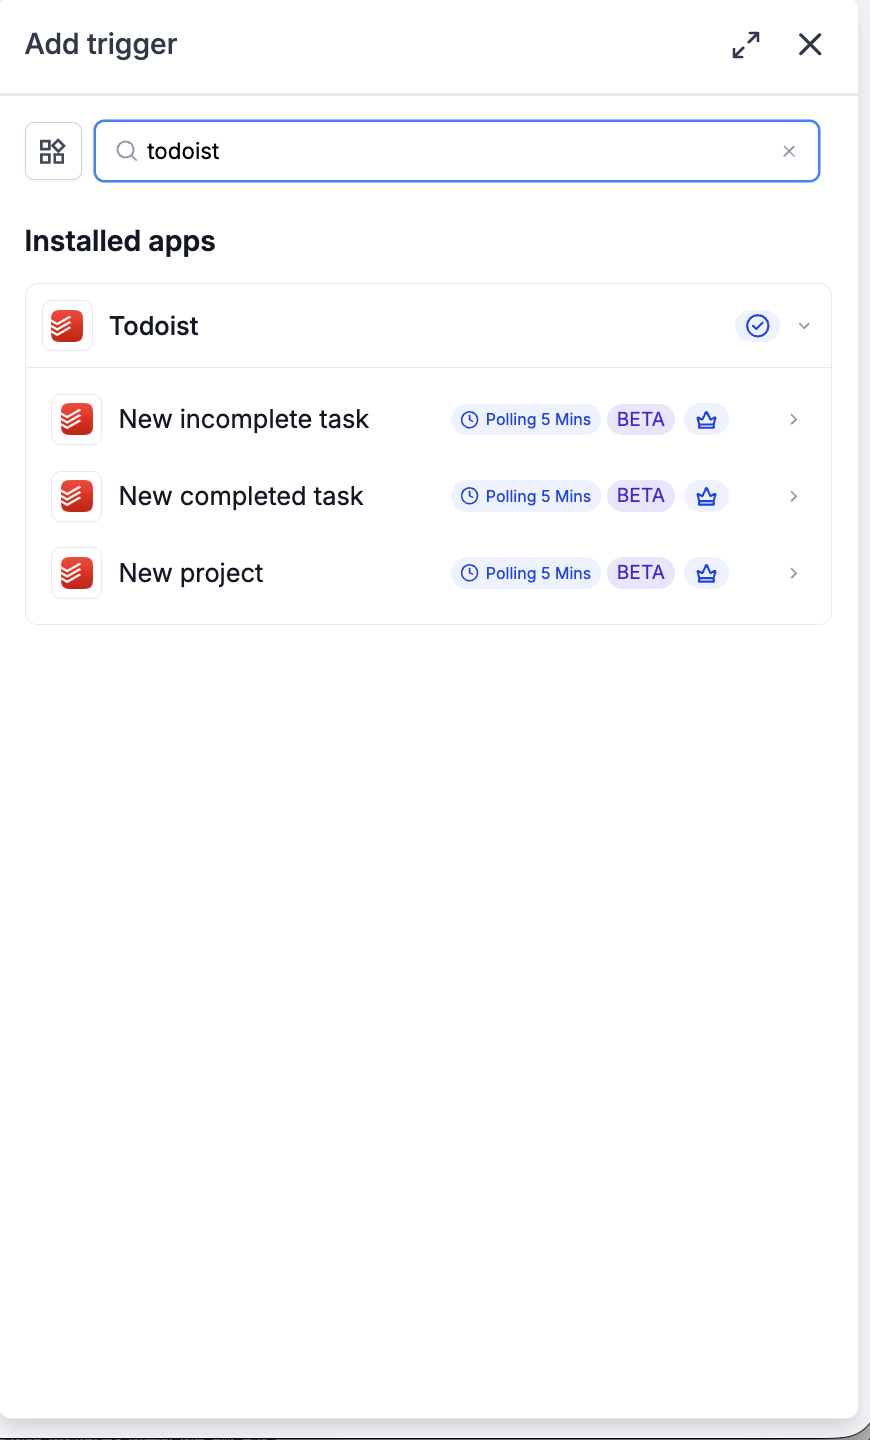
- Triggers (Todoist → Workflows): Three polling triggers — New incomplete task, New completed task, New project — all polling every 5 minutes.
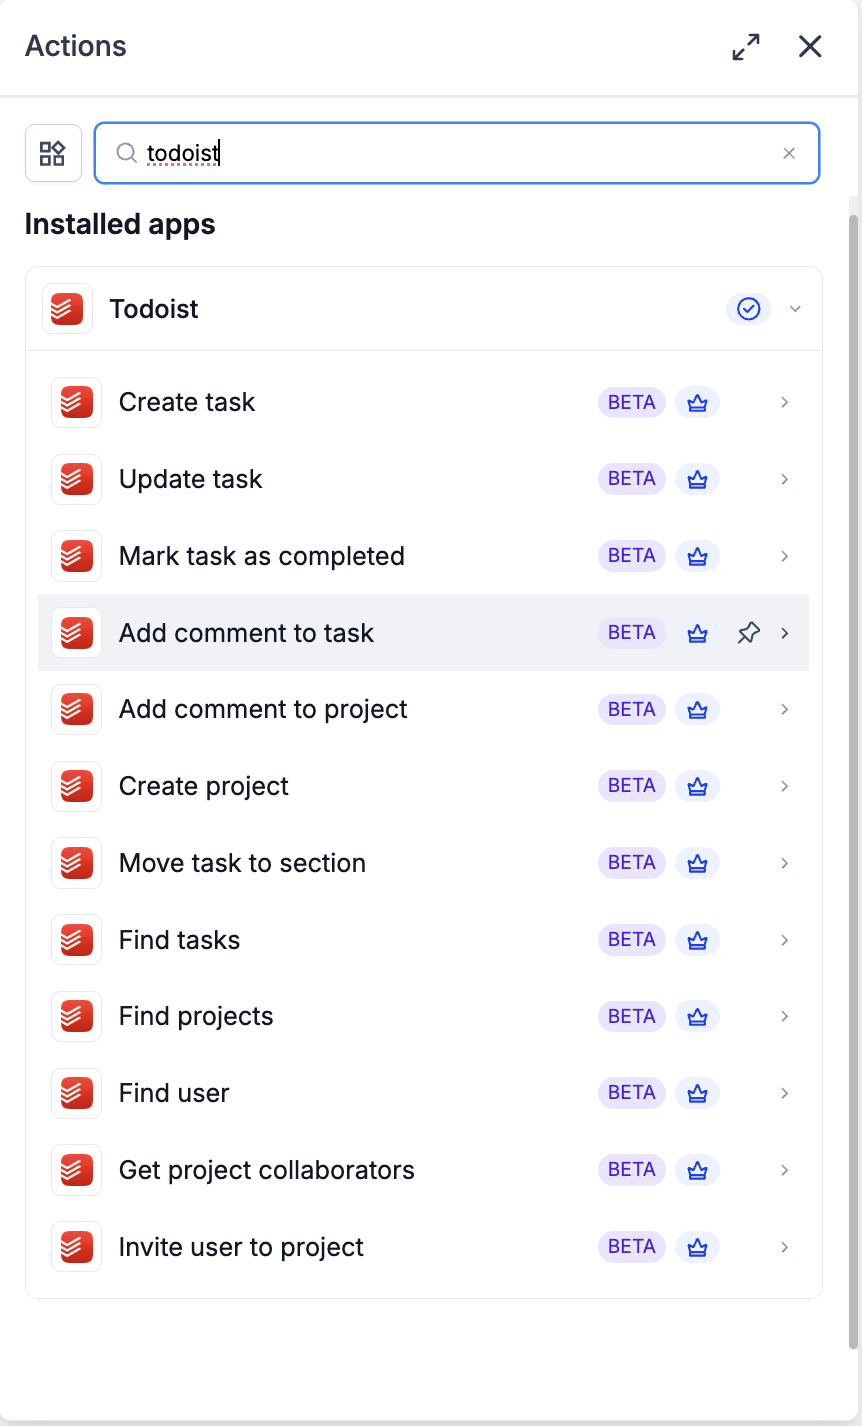
- Actions (Workflows → Todoist): Twelve actions covering task lifecycle (create, update, mark complete), task and project comments, project creation and section moves, discovery (find tasks, find projects, find user), and collaborator management (get collaborators, invite user).
All triggers and actions are flagged as premium workflow components — premium action credits apply at the standard automation rate. Todoist plan usage (projects, tasks, collaborators, integrations) is billed by Todoist directly on your Todoist account.
How to Set Up Todoist
Before any Todoist trigger or action can run, the integration has to be connected via OAuth.
- Connect via the Workflow Builder (recommended)
- Open Automation → Workflows and pick (or create) a workflow.
- Add a Todoist trigger or action — search for Todoist in the Apps tab.
- Select any Todoist trigger or action.
- On the panel, click Connect your account.
- You will be redirected to Todoist’s OAuth authorization screen. Approve the requested scopes.
- You will be returned to the Workflow Builder; the panel will update to show Connected.
Connect via Settings (alternative path)
- Go to Settings → Integrations.
- Locate Todoist and click Connect.
- Complete the OAuth flow.
Example: Setting Up a Trigger (New incomplete task)
This walkthrough wires up a workflow that fires every time a new task is created in a specific Todoist project. The same configuration shape applies to New completed task and New project — only the trigger selection and applicable filters change.
Step 1: Add the trigger
- Open the workflow and click Add trigger.
- Switch to the Apps tab and search for Todoist.
- Select New incomplete task.
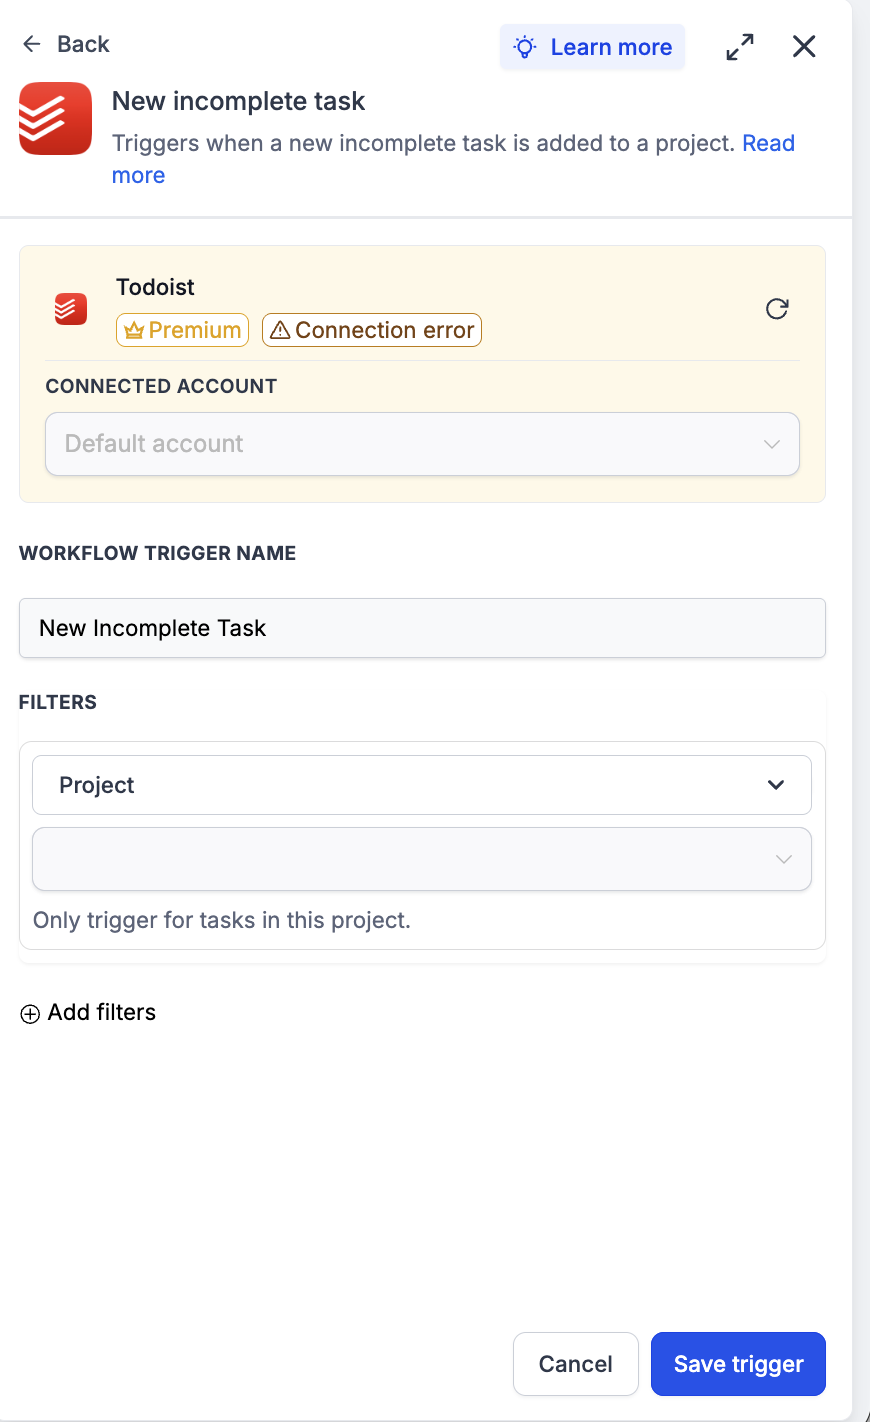
Step 2: Configure the trigger
- Connected Account — pick the Todoist account this trigger should watch.
- Workflow Trigger Name — a meaningful label, e.g. ‘New Support Task’.
- Filters → Project — pick a project to scope to (helper text reads ‘Only trigger for tasks in this project’). Leave empty to fire on tasks in any project.
- Add filters (optional) — layer on additional conditions (label, priority, due-date range).
Step 3: Test the trigger
- Click Find new records inside the Test your trigger panel.
- If no matching records appear, add a task to the target Todoist project and wait one polling cycle (5 minutes), then re-fetch.
- Select the returned record as the mapping reference.
- Click Save trigger.
Example: Setting Up an Action (Create task)
This walkthrough creates a Todoist task from a workflow event — the most common outbound-to-Todoist pattern.
Step 1: Add the action
- Inside the workflow, click Add to insert a new step.
- Open the Apps tab and select Todoist.
- Choose Create task from the action list.
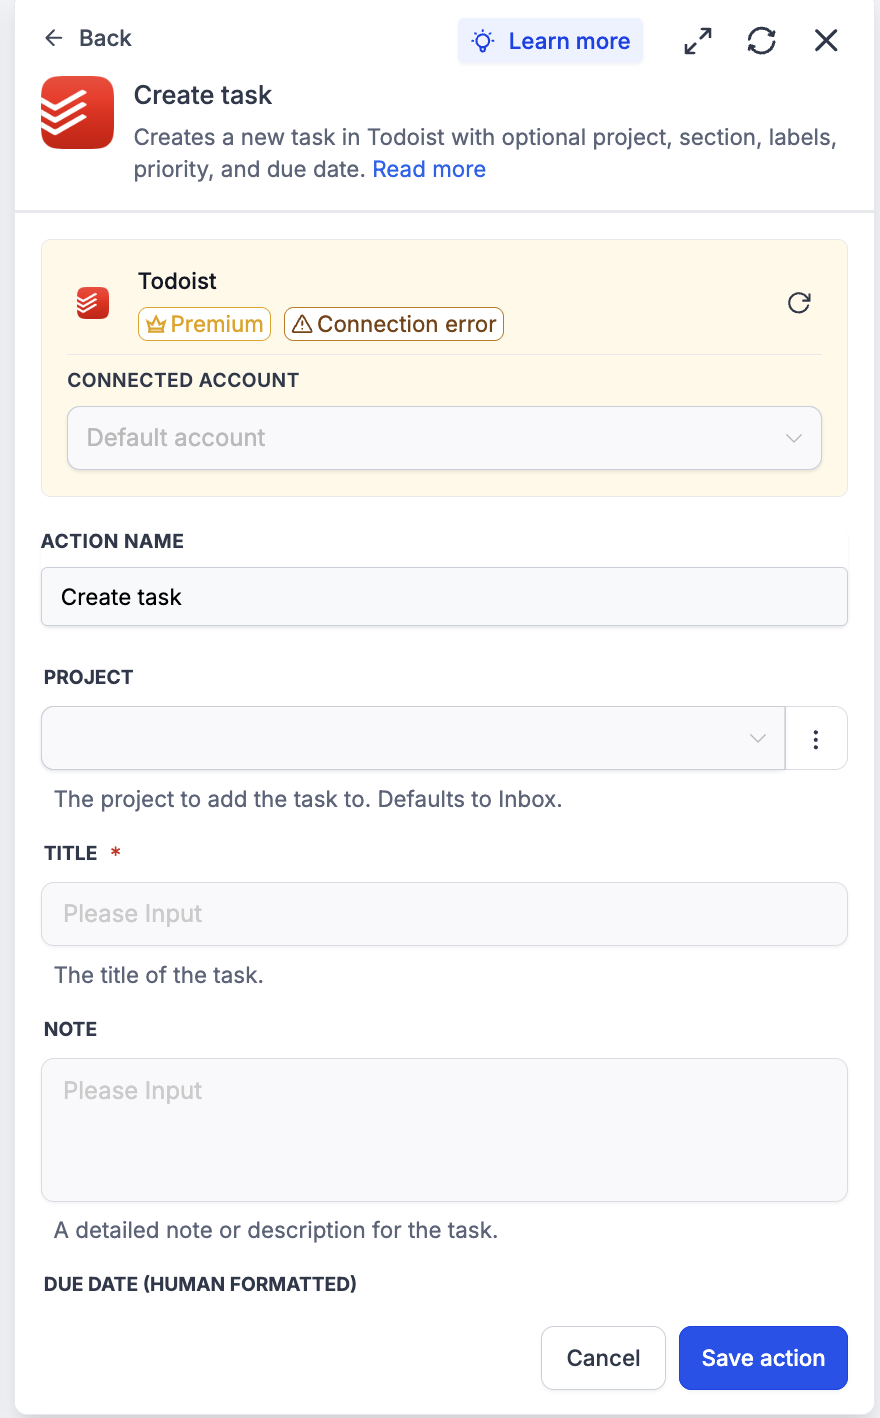
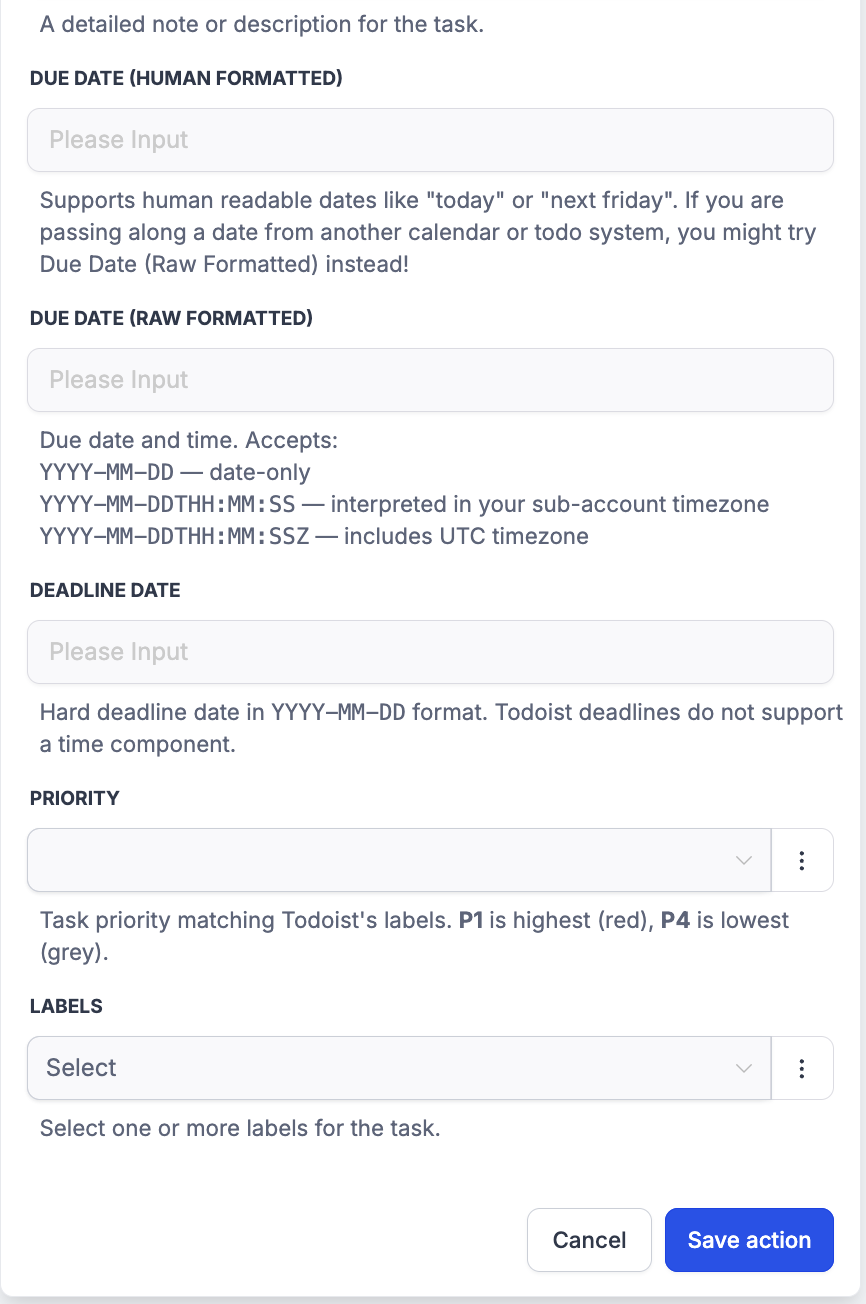
Step 2: Configure the action
- Connected Account — pick the Todoist account where the task should be created.
- Action Name — e.g. ‘Create Task from Form Submission’.
- Project — pick from the dropdown. Defaults to Inbox if not specified. Use Find projects upstream to resolve the project ID from a project name if it isn’t known at build time.
- Title (required) — the task title. Keep it concise for clean rendering in Todoist’s task lists.
- Note — a detailed description for the task, if the title alone doesn’t carry enough context.
- Due Date (Human Formatted) OR Due Date (Raw Formatted) — pick one, not both. See ‘Working with Due Dates and Deadlines’ above.
- Deadline Date (optional) — hard deadline in YYYY-MM-DD. Todoist deadlines don’t support a time component.
Step 3: Test the action
- Click Test action.
- Confirm — this creates a real task in Todoist. Use a clearly-marked title (‘TEST — DELETE’) if testing against a production project.
- Save the action and run a full Test workflow before publishing.
How to Test Triggers and Actions
Always test before publishing. Testing locks the payload schema and gives downstream steps a real record to map against.
Test a trigger
- Inside the trigger panel, click Find new records.
- If no matching records appear, create or complete a task in Todoist (or create a project) and wait one polling cycle (5 minutes), then re-fetch.
- Select the returned record as the mapping reference.
Test an action
- Inside the action panel, click Test action.
- The action runs against the live Todoist account — real tasks, comments, or projects are created.
- Verify in Todoist and clean up test records afterwards.
Common Use Cases
Use Case 1: Form submission → Todoist task in the right project
Goal: Route inbound requests into Todoist as tasks with the right project, labels, and priority.
Workflow Setup:
- Trigger: Form submission
- Optional: Branch on form input to determine the right project or priority
- Action: Find projects (resolve the target project ID by name)
- Action: Create task (title from form, note with the full submission body, priority based on urgency signal, labels for team routing)
Example: A customer submits a support request marked ‘urgent’. The workflow finds the ‘Support Backlog’ project and creates a P1 task with the full request as the note, labeled ‘external-report’ — the support lead sees it in Todoist within seconds without leaving their task list.
Use Case 2: Task completed → close the loop in the platform
Goal: Take action when a Todoist task is marked complete.
Workflow Setup:
- Trigger: New completed task (filter by project)
- Action: Match the task back to the originating CRM contact (via a stored task ID or a label carrying the contact reference)
- Action: Update contact / send notification / advance a stage
Example: A ‘Follow up with Acme’ task is marked complete in the AE’s Todoist. Within 5 minutes, the CRM contact’s custom field is updated (‘last touched: today’) and the deal stage is bumped — Todoist stays the AE’s working list, and the CRM records get updated for free.
Use Case 3: Team task with due date and label
Goal: Create a task on a shared project with proper metadata for routing and reporting.
Workflow Setup:
- Trigger: Any operational event needing follow-up
- Action: Create task (Project = shared team project, Priority = P2, Labels = ‘needs-review’)
- Action: Add comment to task (context / links / instructions)
Example: A signup-abandonment automation creates a task in the CS team’s Todoist project with a note linking to the abandoned session, priority P2, and label ‘needs-review’ — a CS agent picks it up within their normal workflow.
Was this article helpful?
That’s Great!
Thank you for your feedback
Sorry! We couldn't be helpful
Thank you for your feedback
Feedback sent
We appreciate your effort and will try to fix the article